|
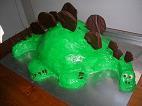
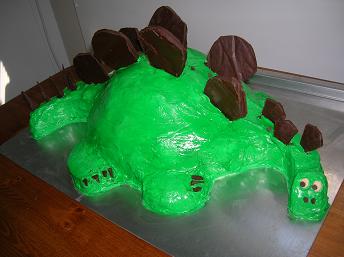
Stegosaurus-Shaped Cake
Ingredients:
Cake-Shaping Strip (from 8 sushi-mat segments)
Heavy-duty aluminum foil
Sheet pan
Oven-safe bowl from standing mixer
Prepared cake batter (from about 3 boxes of cake mix, but see instructions)
Frosting (about 3 (16-oz.) store-bought white frosting tubs)
Food dye
24 ounces of semi-sweet chocolate chips
2 tablespoons of canola/vegetable oil
1 sheet wax paper
1/4 cup mini chocolate chips
Instructions:
1. Line a sheet pan with 2 slightly overlapping sheets of aluminum foil. Shape the Cake-Shaping Strip into a top-down shape of a stegosaurus dinosaur. Try to make the body roughly circular with a diameter about equal to your mixing bowl's diameter at half-height. Exaggerate the spatial features, as they'll seem smaller after you unwrap and ice the cake. Wrap the bottom foil layer around the strip, cutting the foil if needed. Press small balls of foil into outer corners or edges if you think that the foil didn't wrap around the portion well enough to prevent cake-batter leakage. Wrap additional 3x6-inch pieces of foil around select regions of the strip if needed to prevent leaking.
2. Prepare cake batter from TWO boxes of cake mix, but add only 1 cup of water per box of cake mix to make a slightly thicker batter. Spray the strip and foil with cooking spray. Pour the cake batter into the prepared "pan", pouring slightly less batter near the ends of the "head" and "tail". Bake at 375 degrees until done. Let the cake cool. Cut away any cake batter that leaked through the strip. Carefully remove the Cake-Shaping Strip. Insert the flat edge of a table knife between the strip and the cake if this helps.
3. Meanwhile, prepare more cake batter from the third box of cake mix. (Prepare according to package directions.) Spray a large oven-safe bowl (e.g., a bowl on a standing mixer) with cooking spray. Pour batter into the prepared bowl. Bake until done. Let cool. Remove the cake from the bowl, and cut off the top of the cake using a serrated knife, such that there is a flat top surface.
4. Apply a thick layer of frosting to the "body" portion of the bottom cake. Top with the cake made from the bowl.
5. Apply a thin coat of the frosting (a "crumb coat") and let that dry.
6. Dye the remainder of your frosting a dinosaur color, and frost the cake.
7. Combine the 24 ounces of semi-sweet (not milk) chocolate chips and 2 tablespoons canola/vegetable oil in a microwave safe bowl. Microwave for 30 second intervals, stirring in between, until the chocolate mixture is smooth. Line a large tray with wax paper, and pour the chocolate onto the wax paper. Refrigerate the chocolate layer. Once the chocolate is hardened, cut dinosaur plates, spikes and nails out of the chocolate using a table knife. Freeze these pieces for 5-10 minutes.
8. Cut small slits along the dinosaur's back. Stick the chocolate plates and spikes into these slits. Place the nails onto the legs. Ice the dinosaur's face as desired, and sprinkle mini chocolate chips on the cake for dinosaur "spots". If this cake is going to be served in a slightly warm environment or sitting out for awhile before serving, refrigerate the cake or freeze for 20 minutes to prevent the chocolate from melting.
|