|
July 15, 2012 - Police Car Cake
Click here for short instructions
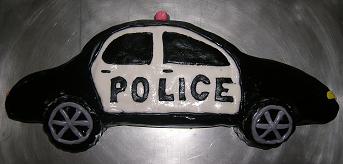
I thought to myself that the site was a little shy on vehicles, so I decided to make a car cake for this month's blog. Then I thought that I'd make a police-car cake, which could be used for a youngsters' birthday party or as an appreciation cake for the hard work of the police staff in our communities. Of course, you can decorate this car cake in any other manner should it be more fitting for your event, but this is how mine turned out:

To make this cake, you'll need a Cake-Shaping Strip (look here about how to make one), heavy-duty aluminum foil, a sheet pan, prepared cake batter (see the Chocolate Cake recipe below or use about 1 box of cake mix), frosting (about 1 container of white frosting), fondant (use our Easy Marshmallow Creme Fondant recipe) and food dye.
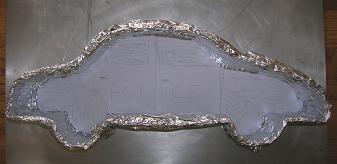
First, make a Cake-Shaping Strip as described here using six sushi-mat segments. Line a sheet pan with two vertical sheets of slightly overlapping foil. Shape the strip into a shape of a car. I originally thought that I'd be able to free-form the car shape, but it turns out that I could not envision a car shape as well as I thought I could. So I drew out the shape on two, taped together sheets of paper, cut out the shape, and used this is as a template.
After the strip is shaped, wrap the foil sheets around the strip. Cut the foil or use extra foil pieces where needed to wrap around the strip (e.g., around the wheels).

Now prepare your cake batter. Here's a from-scratch fudgy chocolate-cake batter. This recipe makes a bit much for the shape, so I poured the extra into a small cake pan and sampled that while decorating the cake. You could also prepare about one box of cake-mix for this cake.
Fudgy Chocolate Cake
Ingredients:
3 cups flour
3/4 cup sugar
2/3 cup cocoa powder
2 teaspoons baking powder
1 teaspoon baking soda
1/2 teaspoon salt
3 eggs
1 cup Greek plain yogurt
3/4 cup (i.e., 1 1/2 sticks) butter, melted
1/2 cup canola oil
1 cup water
Instructions:
1. Preheat oven to 350 degrees. Spray a pan with cooking spray.
2. Mix together the flour, sugar, cocoa powder, baking powder, baking soda, and salt in a large bowl. Mix in the eggs. Beat in the remaining ingredients.
3. Pour batter in prepared pan.
4. Bake for about 35 minutes or until done.
*****
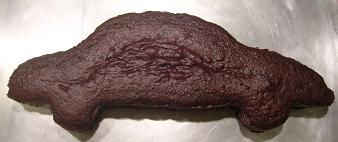
After baking, carefully remove the wrapped foil and then the strip. If any batter leaked through the strip, cut it away from the cake before trying to remove the strip. While separating the strip from the cake, you can insert a knife between the strip and cake to help with the process (if it doesn't easily peel off by itself).

Decorating using fondant seemed like a good option, to give the car cake a nice, smooth finish. I made one batch of the Easy Marshmallow Creme Fondant recipe. Then I separated 1/3 of the prepared fondant from the rest. To the remaining 2/3, I added some black food dye and some additional powdered sugar such that the fondant would return to its nice consistency.
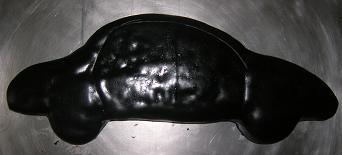
When the fondant is prepared, roll the black portion out between vinyl mats greased with cooking spray. Then spread a medium-thick layer of white frosting over the entire cake. Remove the top vinyl mat and flip the fondant onto the cake. Gently remove the remaining mat from the fondant. Cut away the rolled-out excess black fondant portions, setting them aside in single layers. Then press the fondant into the cake (using a fondant press or your hands).
Cut a sheet of paper in the shape of the white section of the car. Gently place that on the cake and score (that is - light create an outline in the fondant using a table knife) around the paper. After the paper's removed, here's what it looks like:

Using the table knife, cut through the fondant along the scored perimeter and remove the middle section.
Time for the white fondant. Clean the vinyl mats if necessary and then roll out the white fondant. Remove the top mat, and place the paper on the fondant. Cut a region slightly larger (about 1/2 a centimeter farther than the paper's perimeter) than the paper. Remove the bordering portions of the fondant and set them aside. Use a metal spatula to loosen the fondant section from the mat and then transfer it to the cake. Gently tuck the white edges into the black edges.
Hopefully this goes cleanly. For me, I was stuck with a little white color on the black section. So I gently pressed on a very thin and small portion of black fondant. Then I sprayed the region with cooking spray and repeatedly circled the region with my index finger (after washing my hands thoroughly) to smooth out the surface.
Remember those black rolled-out portions of fondant that you set aside? Use a table knife and cut out the lettering for police and the windows. Then transfer them to the cake. Also, use your fingers to roll out two lttle lines of black fondant and add the car-door handles to the cake.
Remember those white portions of fondant that you set aside? Take three small sections and add a drop of red, yellow and blue food dye to each respective portion. Then shape these sections into the police lights (successively stacked along the back of the cake, which is the top of the car), tail lights and headlights and press them into the car cake.
Finally, take a section of white fondant and add a little of the black fondant so that it turns gray. Roll out little sections using your finger on a countertop, and shape these into the perimeters and lines of the hubcaps on the car.
Lots of detail in this blog, but hopefully you get a good picture of how to make every element of this cake. Now it's time to enjoy it:
|